¶ Payment In
Usage: This screen is used to record all cash receipts or transfers. It is the interface through which you can add a new receipt, or search for, modify, delete, view, or print existing receipts.
¶ Preconditions
Users must have the necessary permissions to access the Payment In module.
The system should have pre-configured branches, banks, treasuries, payment methods, and GL accounts.
¶ Screen Navigation
Path: Finance Module > Transactions > Payment In > Add
The Add screen is accessed by clicking the Add button on the Payment In list view screen.
When you enter the screen, you are typically in search or display mode, where you can view or filter existing receivables.
- Search: This general field searches for a specific receivable using a code or part of the description.
- Date Search: A field (or two fields, “From Date” and “To Date”) to filter receivables by their creation date or receipt date.
- Payment Center: A field to filter receivables by payment center (revenue center or recipient).
- Payment Center Details: A field for more precise filtering based on payment center details.
- Bank Accounts: A field to filter receivables by the bank account or treasury into which the amount was deposited.
- Status: A field to filter receivables by their status (e.g., approved, pending, canceled, paid).
- View: A button to click after specifying search/filter criteria to view the results.
- Export: A button to export the displayed data (usually to an Excel or PDF file) for external use or archiving. Actions (Edit - Delete - Details - Print): These icons or buttons typically appear next to each record (receipt voucher) in the results list.
- Edit: Opens the receivable voucher and changes its details.
- Delete: Deletes the receivable voucher (often requires specific permissions, and there may be restrictions on deletion after approval).
- Details: Displays all details of the receivable voucher in read-only mode.
- Print: Prints the receivable voucher.
- Sequence button: This button or section relates to the automatic receivable voucher numbering settings.
- Status: Indicates the status of the sequence setting (enabled/disabled).
- Allowed indicator: May indicate whether this sequence can be manually modified.
- Sequence applied to (Company - Branch * - Unit - Screen): Specifies the scope of the sequence (whether it is company-wide, a specific branch, an organizational unit, or only on this screen). Branch indicates that the branch can be selected. Sequence Type (Annual, Monthly, Daily, Continuous): Specifies how the vouchers are renumbered (e.g., starting at 1 each year, each month, each day, or continuing without resetting).
- Part: This may be a field to add a fixed part to the beginning or end of the sequence (e.g., “Receipt-” or “-2025”).
- Value: The current number of the sequence (i.e., the last number used).
- Option: This may be an additional option to control the behavior of the sequence.
- Actions (Delete): To delete the sequence setting.
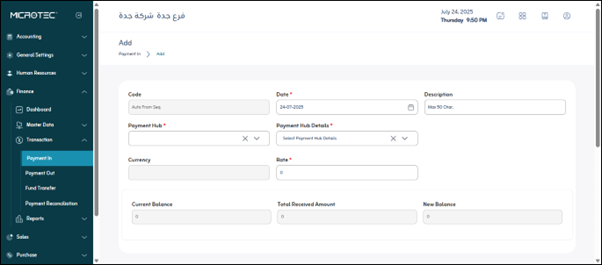
When you click the “Create” button (usually a large, clearly marked button), you will be taken to an interface for entering data for a new receivable voucher:
- Code: The receivable voucher number, which may be manually entered or automatically generated based on the sequence settings.
- Date*: The date the receivable occurred. This is usually a mandatory field.
- Description: A brief description of the receivable (e.g., “Sales Invoice Collection No. 123”, “Rent Amount”).
- Payment Center*: The entity or department to which the receivable will be linked (usually a mandatory field).
- Payment Center Details*: Additional details about the payment center (usually a mandatory field).
- Currency: The currency in which the payment was received (appears automatically based on the bank account or can be selected).
- Exchange Rate*: If the currency is different from the system’s base currency, this field is used to enter the exchange rate to convert the amount to the base currency (mandatory field).
- Current Balance: This may refer to the current balance of the selected bank account or treasury before adding this receivable.
- Total Amount Received: The total amount received for this voucher.
- New Balance: The expected balance of the bank account or treasury after adding this receivable (calculated automatically).
- Advance Payments Indicator: This is usually a checkbox. If selected, this indicates that the amount received is an advance payment (not against a currently selected invoice) and will be settled later.
- Tax Type*: Specifies the type of tax applied to the amount if part of it is a tax (mandatory field).
- Amount Including Tax: If tax is enabled, this field displays the total amount including tax (or allows you to enter it).
¶ Payment Details
- Amount: The value of the selected item in the payment.
- Payment Method: The method by which this amount will be received (cash, check, bank transfer, credit card, etc.).
- Payment Method Details: Additional details about the payment method (e.g., check number, name of the issuing bank, transfer number).
- Paid By: The name or code of the paying party (e.g., customer name).
- Paid By Details: Additional details about the paying party.
- Associated GL Account: The corresponding account in the General Ledger to which this amount will be posted (e.g., sales revenue account, customer receivable account).
- Cost Center: The cost center associated with this item if revenue needs to be tracked by cost centers.
- Notes: Any additional notes specific to this receivable item.
- Actions (Delete): A button to delete this selected item if there are multiple items within a single receivable.
Save: A button to save all entered data and create a receivable.